Firmware & Guides
Ender 3 Max Bltouch Setup & Firmware Installation
Bltouch for Ender 3 Max?

310*320mm print size is huge, normally you have to do manual bed leveling every few prints to get your first layer correct and prevent spaghetti printing. A way to get rid of manual leveling is to install bltouch on to your Ender 3 Max. BLTouch has repeatable precision up to 0.005mm therefore after installing BLTouch, you can have smooth & better first layer print every time.
Gathering Materials & Firmware
Necessary material is needed for Ender 3 Max BLTouch installation, here’s what you need, assuming you already own an Ender 3 Max:
- BLTouch
- Extension Wire for BLTouch (1.5 meter is recommended)
- 4 x M3 screws + 4 x M3 screw nuts (Only need 2 set if you are getting the bltouch package)

- 3D printed sensor mount by SuperMattInc
- Download the latest Ender 3 Max firmware over
- https://drive.google.com/drive/folders/11GDGjnU3aEFJGCwqQPoInB0ooIjD79Ol
The latest firmware at the moment is Ender-3 Max -BL-Touch V1.0.1.6
*Note if you are having random probe fail issue, please check the FAQ & install the z stop firmware instead
Setup & Flash Guide

Here’s a simple guide on how to install BLTouch:
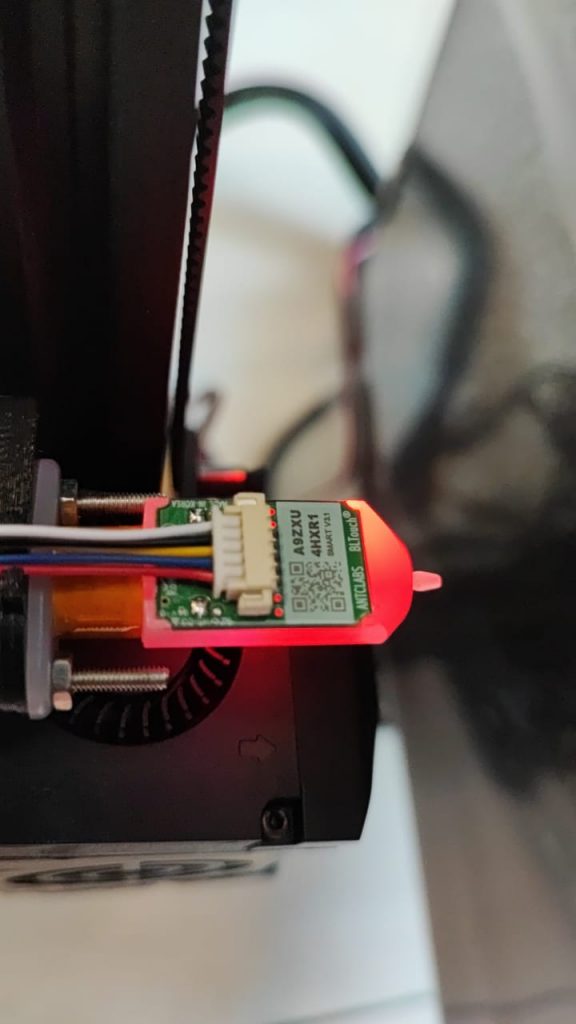
- Mount the BLTouch with the part 3D printed sensor mount or the part provided if you are using a kit.
- Turn your printer so you can access the electronics cover as well as access to the mainboard.
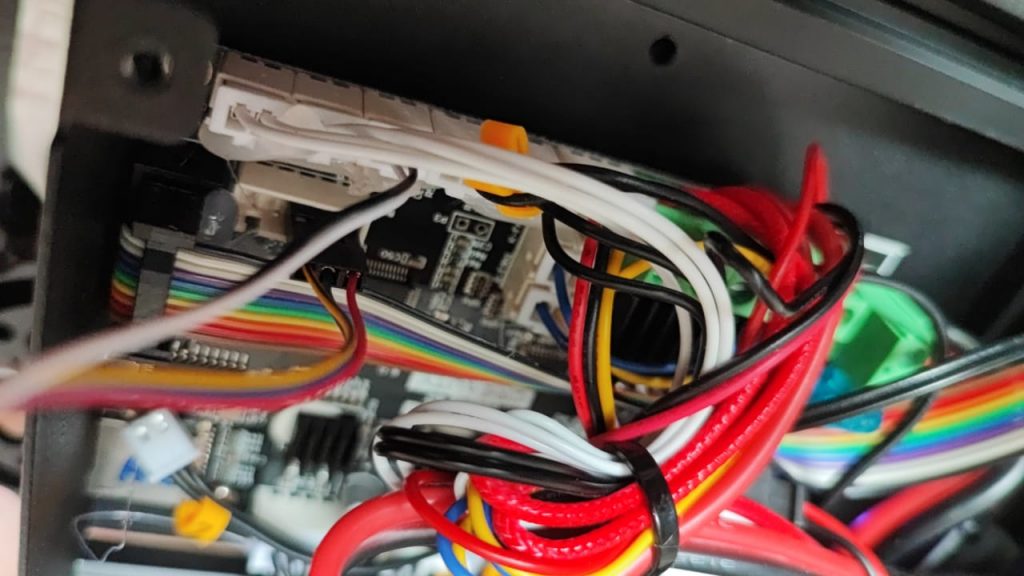
- Plug in all the 5 pins into the bltouch port (follow the picture above)
- Turn your printer back to the original position.
- Rename the downloaded firmware into “firmware.bin” & put it on the to roof of your MicroSD Card
- Insert MicroSD into your printer & turn it on
- Wait a few seconds and that’s it! As long as BLTouch is probing twice during the startup means it should be working fine. check our FAQ incase it wasn’t working for you.
Leveling Guide

For the very first time, you still need to do once manual bed leveling to make sure the bed is not too far or too tilt. For saving the settings it is important to have an SD card inside the printer. The settings are saved to the SD card and not to the EEPROM. Without the save settings, the Z Offset isn’t saved. (Thanks to Matthijs)
- Do manual leveling using CHEP profile gcode. Adjust each corner by running a piece of paper under the nozzle until you can barely move it then click the LCD knob to advance to the next corner.
- Heat up your nozzle until at least 150C (if using PLA previously) and bed to 50C. Remove all the excessive residue around the nozzle.
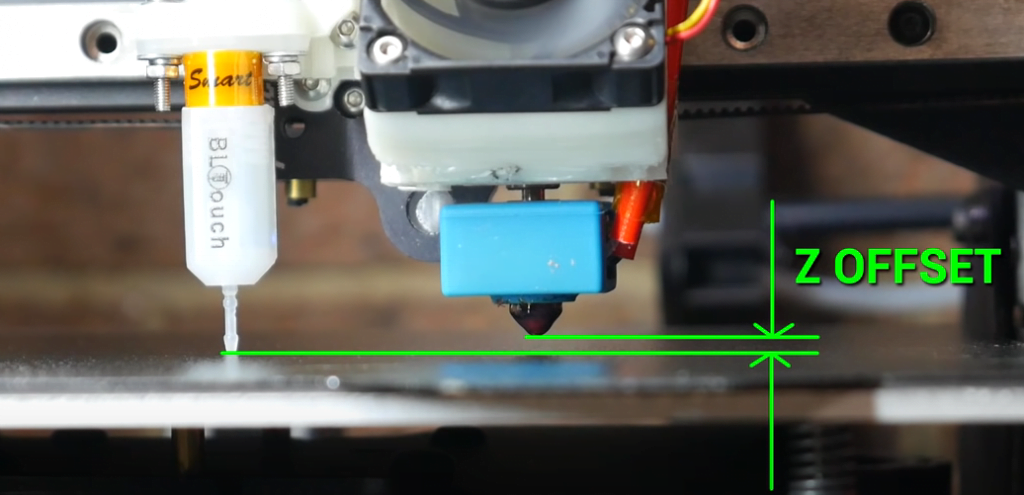
- Go to Control > Probe Offset Z to start some value. -2.75 seems to do OK as a start. (Thanks to Steve for the correction)
- Auto Home
- Put paper under the nozzle, go to Prepare > Motion > Z axis. Gradually lower the Z (may go negative) until the paper drags. Note the value you end up with. If it’s zero, you’re done.
- Subtract the final Z position from the offset value (remembering subtracting two negatives makes it more positive) & update your Probe Offset Z again.
- Repeat from step 4.
- Store it. That’s it!
- Don’t forgot the add G29 or M420 S1 after G28 in start of your gcode
- Run ChepTestPrint to see if all places are working fine.
If you are using Marlin firmware (above Creality firmware please do ignore)

- Go to Control > Probe Offset > Z Probe Wizard, adjust the new z offset until it’s just squeezing the paper (z offset value should be around -2.75)

- Adjust Probe X Offset to +47.0 and Probe Y Offset to -8.0
- Auto generate BLTouch Mesh leveling by going into Prepare > Bed Leveling
- Store Setting and that’s it!
- Don’t forgot the add G29 or M420 S1 after G28 in start of your gcode
- Run ChepTestPrint to see if all places are working fine.
FAQ
BLTouch blinking at the start
The 3 pin of the bltouch is wired incorrectly or loose.
BLTouch crash into the bed when rehome
The 2 pin of the bltouch is wired incorrectly or loose
BLTouch failed to probe many times
If your bltouch keep failing, high chance it’s 4.2.2 board issue with 5 pin bltouch
Solution 1: Re-wire your bltouch like this and install the z stop firmware


Credit to Solihin Din (6th Aug 2021 Marlin Build)
https://drive.google.com/file/d/1g_WNBeGPRgkj96nsLJoJW81MBzoXFAow/view?usp=sharing
Older Build
https://github.com/smith3d/3DPrinterFirmwareList/blob/main/Ender3Max/29-5-2021/E3-Max-Z-Min-2.0.8-FilamentSensor.bin


Hi, I have just received my ender-3 max. Board is the v4.2.2 and 1.0.1.8 version. I have tried to download the firmware to install a BLtouch on it but nothing seems to happen when I insurts SD card and switch it on. Do I have to extract the file or what? Just can not seem to get the file I need for the printer to read it and update the firmware. If anyone has the file please help it is driving me insane.
Nic
rename the file name & try again. e.g. firmware2.bin and increment every time you flash
Hi you need to format the sd card and set the cluster size or allocation unit size to either 4096 bytes or 4KB both are the same seems to help some people. Before you format save anything you may want on the sd card somewhere else as formatting will clear all the data.
Hi.
No options to select either 4096 bytes or 4KB. Only 8192 bytes, 16,32 and 64 Kb
i purchased a sprite extruder pro kit to put on my ender 3 max
could you help me with finding correct firmware to get temp up too 300
i will be printing with gf nylon
thank you
In this case, you may want to self compile the firmware. Set the temperature setting to max 300 will do. We don’t have pre-compiled firmware at the moment.
I just installed my BL touch, downloaded the firmware. My BLTouch is just flashing red. What does this mean?
wiring, check the wiring sequence.
If I install this screen: https://www.smith3d.com/shop/parts-and-accessories/ender-3-v2-screen-kit-jyers-firmware-creality-24-bit-colorful-intelligent-ender-3-3-pro-3-max/
with a 4.2.7 board, I will be able to preview the g-codes like this https://github.com/mriscoc/Marlin_Ender3v2/wiki/How-to-generate-a-gcode-preview ?
yeap, you can do that, be sure to set the bed size to 300×300
hello, how can i solve this problem with this page showing? eyeg
Please tell me. I cannot adjust bltosh. Raise the nozzle strongly above the table and then lower it. I’m new 🙁
I have complied and build new firmware for this printer with BLtouch probe connected to Z-Min-Limit switches (same as per Smith3D FAQ firmware) because this is more stable at the moment. The reason im compiling new firmware is to change the preheat value for Bed Leveling from Extruder:120 Bed:65 to E:0 Bed:50. When you press Level Bed in the Menu, you will notice printer will do nothing but if you go back to Info Menu, you will see the bed heating up and will start levelling once reach desired temperature. If you to use command G29 everytime before print and want to use bed temperature lower than 50, set your Bed temperature (M140 command) after G29 command in your Start Gcode, this way the printer will revert back to your desired temperature. The firmware using latest Marlin Bugfix downloaded and compiled on 6/8/2021.
download here: https://drive.google.com/file/d/1g_WNBeGPRgkj96nsLJoJW81MBzoXFAow/view?usp=sharing
thanks. just updated in the FAQ, others should be able to use this.
Hi Solihin,
I have tried the suggested alternative wiring for random probing failure with 4.2.2 motherboard and your firmware
It now performs the 16-steps bed leveling process with no issues, I have done it many times.
However it has a critical issue: it appears the Y endstop position is reversed in the firmware build.
When I do auto home it correctly reach the X endstop, but then slams the bed on the opposite side of where the bed endstop is, producing bad noises.
I haven’t tried printing because I’m afraid to damage the printer.
May I ask you to recompile a firmware with inverted Y stop setting?
With regards
Nick
Dear all, please disregard my previous comment. There was an issue with the connector of the Y endstop which led to puzzling results. Once restored the new firmware works as expected.
Best of all, this solved erratic BLTouch operation!
Is there a newer update?
This is a great guide. Mine was motherboard 4.2.2 and would not work with Creality software – leveling kept crashing and trying to lower through the bed. So followed guide above and switched to use the Z axis input with their updated software. Bed leveling works perfectly now.
Does seem to be a bug in the Marlin firmware though – before leveling, the firmware takes to bed to 65 degrees (line 1480 of configuration.h). But it never takes it back to what you set the bed temperature in your gcode. Hope this gets fixed as for now I have to manually override to drop the temp to my setting (usually 60 degrees). Is there a bug reporting facility somewhere I can enter this?
I’m busy with other machines at the moment, if you have the latest bin file, do share with me. Will put it inside the post 🙂
I am doing the Creality firmware and I’m stuck on step 5. Every time I try to gradually lower the Z-axis, it won’t move, but when I increase it, it moved. Am I doing it right? For the wiring, I am using the Pin27 board since the BLTouch I got has (VCC,GND,SIG) instead of the normal (GND,VCC,SIG), and the BLTouch firmware I downloaded is from https://www.creality.com/download. Specifically this one (https://file2-cdn.creality.com//website/3763a2d6-0293-4dab-8521-a208daccb521).
Downloaded and installed the Creality Ender-3-Max-V1.0.1.6BLTouch.bin on my SD card and then turned on the printer. Screen was blank for a little while and then the Ender home screen appeared. I checked using the About menu option and see that it did install Marlin V1.0.1.6.
Leaving the SD in the printer and selected Auto Home from the Menu. X & Y Carriage both auto home then the print head moves to the center of the bed and print head raises approximately 10mm then the BLTouch Deploys Twice and then a message appears on the LCD saying “STOPPED”
Print head then refuses to manually lower from the Move Z Axis menu but does raise as then dial turns in positive motion – never traveling back towards the bed even with negative values are selected from the menu.
Any clues to what I have done wrong?
I was facing the same issue until a friend send me a different firmware which worked great
Do you have that firmware? I. Having the same issue.
How do i download the firmware, it keeps bringing me to Kodi and i have no idea how to use this, sorry for the stupidity, thank you all in advance for your help with this.
you should put the bin file directly into your sd card, not extract it.
My screen went blank after I put in the new firmware and works again after I put in the old firmware. Any advice?
I have the same problem the display is blank
I cant go back to the old firmware for i have no .bin file
with the old firmware. Have you? IF can you send in Mail?
format your SD Card to FAT32, put new firmware in, restart the printer.
it’s a good thing this site has the wiring diagram for the bltouch and the bltouch connector with the wire color codes. my bltouch from creality, had the 2 and 3 pin connector with a pin27, the pin 27 wasn’t working on my 4.2.2 board. I remembered hearing about flipping wires on some of these somewere, and when my pin27 connection from it and the instruction manual didnt work,i needed the color codes. If i’d just plugged them into the right ports, my ground and 5v wires were switched around on the 3 pin connection on my wiring harnesses. i was able to look at the bltouch wiring codes and see the ground was in the middle and 5v was were it should of went. and whatever that would of done. mines all working now.
Pingback: Troubleshooting and Install of the BL Touch on the Ender 3 Max (or others!)
the explanation is completely wrong
if you want to determine the offset, it is best to watch the 3d printer noob on youtube
https://www.youtube.com/watch?v=y_1Kg45APko&t=334s
when i do this processs annd subtract the z value from the offset it consistently gets further away
Ok need some help, new to all this , just got my 3 max a week ago and decided I didn’t want to mess with the bed leveling so installed a BLtouch and now can’t get it to work
Followed the steps above
“1) Set the Probe Z offset to some start value. -2.75 seems to do OK as a start.
2) Auto Home
3) Put paper under the nozzle, go to Prepare > Motion > Z axis. Gradually lower the Z (may go negative) until the paper drags. Note the value you end up with. If it’s zero, you’re done.
4) Subtract the final Z position from the offset value (remember subtracting two negatives makes it more positive)
5) Repeat from step 2”
Started by doing the paper trick set the Probe Z offset and starts to home, goes to the center lifts up and runs the probe and nothing the probe is off the table, change the offset to a positive, no matter what I put in there it goes to a set place and will not touch the glass with the tip of the probe, I have restarted the printer *Every time I do I redo the paper thickness off the table top other wise it goes up even higher off the bed*many times reset everything back to stock and still nothing, there is something I am missing but for the life of me I can’t figure out what…..HELP!!
Any suggestions, it seems this should not be this hard.
I bought a Ender 3 Max on Friday, delivered on Saturday
I have changed the Fans, fitted a BLTouch and compiled a custom firmware to remove comms issues (Print artifacts and warnings from Octoprint). I may change the not so silent main board but it’s only an issue on homing and ABL.
The Marlin firmware isn’t the same menu structure as the Ender-3-Max-V1.0.1.6-BLTouch.bin firmware but it is close (big difference is baby stepping to get better than 0.1mm height adjustment). It is up to date and seems bug free.
Octo print complained about the stock firmware and the BLTouch one, Stock printed correctly and BLTouch one would ocassional under extrude as comms errors were present. I set it to do 25 point bed leveling at high speed and it runs pretty well.
do you have the config file? Maybe I can compile one and share it to the other.
I followed the guide, got the nozzle where I wanted, but when I go to save my settings, I get the error “too far”. I went back through over and over. Reinstalled the Firmware, renamed it too. I was using the Creality firmware for the 3d Max. I haven’t found a Marlin version that is for the Max.
can you point out the exact error you are getting? it would be great if with a screenshot
I would love some additional info on this. The probe wizard is not there for me either? Am i missing something or is the guide?
I installed the firmware, but the control -> probe wizard setting isn’t there. Any idea why?
Agreed. This guide is no help. I cannot set the z offset?? have you figured this out?
Let me update the page slightly, I thought the latest ender 3 max was the same as marlin compile.
I just went through this myself – there is no wizard – just a “Probe Z Offset” under Bed Leveling.
What it seems one has to do is:
1) Set the Probe Z offset to some start value. -2.75 seems to do OK as a start.
2) Auto Home
3) Put paper under the nozzle, go to Prepare > Motion > Z axis. Gradually lower the Z (may go negative) until the paper drags. Note the value you end up with. If it’s zero, you’re done.
4) Subtract the final Z position from the offset value (remember subtracting two negatives makes it more positive)
5) Repeat from step 2
Thank you Steve, my mistake for treating marlin firmware same as creality compiled firmware. Let me update according to your guide.
I figured out the same. Can confirm that the method works which Steve said. Nevertheless, my method was slightly different.
For saving the settings it is important to have an SD card inside the printer. The settings are saved to the SD card and not to the EEPROM. Without the save settings, the Z Offset isn’t saved.
this is a good one, will update it into the guide 🙂