More Guides
Complete Guide to 3D Print Smoothing: Acetone Vapor Bath, Safety & Techniques

Oct
Acetone vapor smoothing eliminates visible layer lines on ABS and ASA 3D prints through controlled chemical vapor exposure, achieving 72-81% surface roughness reduction and an injection-molded appearance in just 10-60 minutes. This post-processing technique transforms rough, striated prints into glossy, professional-looking parts—but only when done correctly with proper safety protocols.
Whether you’re printing functional prototypes, decorative objects, or cosplay armor, solvent smoothing delivers aesthetic results that mechanical sanding alone can’t match. Plus, research from Prusa shows it improves layer adhesion by up to 2x, creating stronger parts. However, working with flammable chemical vapors requires serious attention to ventilation, fire safety, and material compatibility.
In this comprehensive guide, you’ll learn exactly which materials work with acetone vapor smoothing, step-by-step process instructions with specific timing guidance, critical safety protocols to prevent fires and chemical exposure, troubleshooting solutions for common problems, and alternative methods for materials like PLA and PETG.
Table of Contents
- 1. Material Compatibility: Which Filaments Work With Solvent Smoothing
- 2. Safety Protocols: Preventing Fire Hazards and Chemical Exposure
- 3. Step-by-Step Acetone Vapor Bath Process
- 4. Common Mistakes and Troubleshooting Solutions
- 5. Alternative Smoothing Methods for Other Materials
- 6. Design for Smoothing Success
- 7. Equipment Recommendations: DIY to Professional
- 8. Frequently Asked Questions
1. Material Compatibility: Which Filaments Work With Solvent Smoothing
Not all 3D printing materials respond to acetone—in fact, trying to smooth the wrong material can ruin your print entirely. Understanding the chemistry determines which solvents work and why.
ABS and ASA Work Perfectly With Acetone Vapor
ABS (Acrylonitrile Butadiene Styrene) and ASA (Acrylonitrile Styrene Acrylate) are the gold standard materials for acetone vapor smoothing. Acetone dissolves these polymers on a molecular level, causing the surface to temporarily liquefy and flow into a smooth, glossy finish as it re-hardens.
Why it works: Acetone’s molecular structure allows it to penetrate between polymer chains, temporarily breaking intermolecular bonds. As the solvent evaporates, the polymer chains reorganize into a smoother surface configuration.
Results are dramatic: a glossy, injection-molded appearance that completely eliminates visible layer lines in 15-60 minutes depending on part size. Temperature resistance remains stable after the part fully cures over 12-24 hours.
Brand differences matter: Testing shows that Prusament ASA smooths fastest at 15-20 minutes, while some generic ABS brands require 30-45 minutes. Black filament typically takes longer than white or transparent due to pigment density affecting vapor penetration.
Material compatibility matrix showing ABS/ASA as excellent with acetone, with star ratings
PLA Does Not Work With Acetone
This is the most common beginner mistake: Acetone does not smooth PLA (Polylactic Acid). The polymer structure is fundamentally different from ABS, so acetone makes PLA sticky and rubbery rather than smooth and glossy.
⚠️ Warning: Some sources recommend dangerous alternatives like THF (tetrahydrofuran) for PLA. THF was reclassified as carcinogenic in 2017—do NOT use it. Dichloromethane is similarly hazardous and inappropriate for home use.
Ethyl acetate shows some promise for PLA, achieving about 90% roughness reduction in controlled tests, but results are still inferior to mechanical methods. Our recommendation: Use sanding, epoxy coating, or heat gun methods for PLA instead (covered in the Alternative Methods section below).
PETG Requires Dangerous Solvents—Use Alternatives Instead
Acetone is completely ineffective on PETG (Polyethylene Terephthalate Glycol). While chemical alternatives exist—MEK (methyl ethyl ketone), dichloromethane, and ethyl acetate can dissolve PETG—these solvents are highly hazardous and require professional lab equipment, permits, and fume hoods.
For home users working with PETG, we strongly recommend mechanical methods:
- Sanding progression (220 → 400 → 1000 → 3000 grit)
- Careful heat gun application at 200-250°F with constant motion
- Epoxy resin coating (XTC-3D works excellently on PETG)
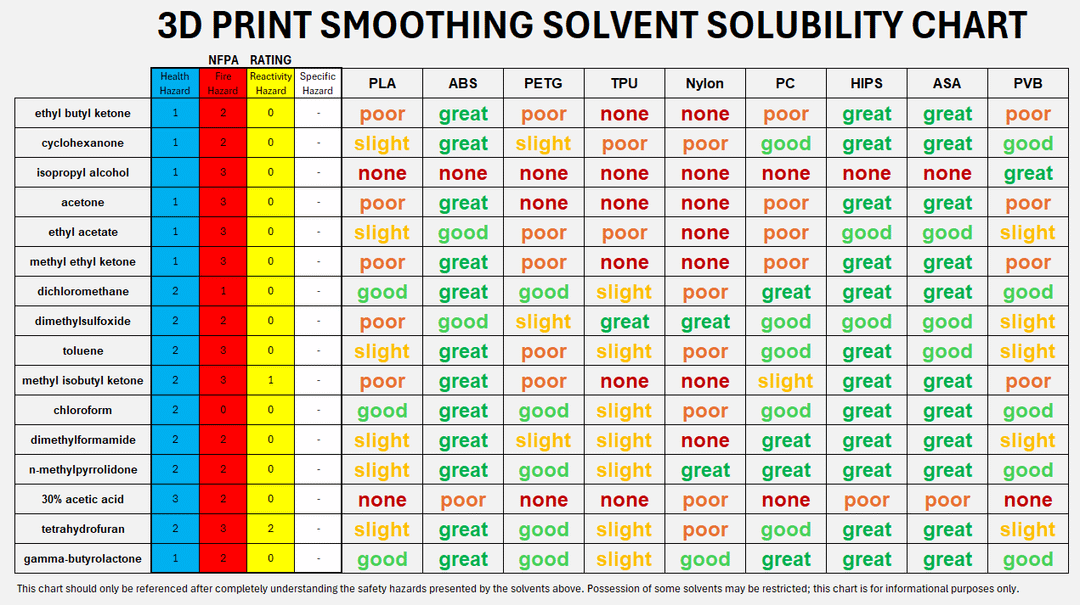
| Material | Acetone | MEK | Ethyl Acetate | Recommended Method |
|---|---|---|---|---|
| ABS | Excellent | Excellent | Good | Acetone vapor (safest, effective) |
| ASA | Excellent | Excellent | Good | Acetone vapor (fastest results) |
| PLA | None | Poor | Slight | Sanding or epoxy coating |
| PETG | None | Good (dangerous) | Slight | Sanding or heat gun |
| HIPS | Excellent | Excellent | Good | Acetone vapor or limonene |
| PVB | Poor | Poor | Good | Isopropyl alcohol misting |
2. Safety Protocols: Preventing Fire Hazards and Chemical Exposure
Acetone vapor smoothing is safe when done correctly, but the process involves flammable vapors and requires strict safety protocols. Acetone’s extremely low flash point (-20°C / -4°F) means it ignites easily at room temperature, and vapor inhalation causes headaches, dizziness, and nausea.
🔥 CRITICAL SAFETY NOTICE: Acetone vapors are heavier than air and accumulate at floor level. Never work near pilot lights, water heaters, cigarettes, or any ignition sources. Always work in well-ventilated areas with a Class B fire extinguisher within reach.
Acetone’s Flammability Makes Fire Safety Critical
Understanding acetone’s hazard profile is essential for safe handling:
- NFPA 704 ratings: Health 1-2 (slight to moderate hazard), Flammability 3 (serious hazard), Reactivity 0 (stable)
- Flash point: -20°C (-4°F) means it ignites easily at room temperature
- Explosive range: 2.6-12.8% vapor concentration in air can ignite with a single spark
- Vapor density: Heavier than air, so vapors sink and accumulate

Safety equipment infographic showing respirator, gloves, goggles, ventilation, and fire extinguisher
Required fire safety precautions:
- Remove ALL ignition sources from the work area (minimum 10-foot radius)
- Unplug hot surfaces, turn off pilot lights, extinguish cigarettes
- Keep a Class B fire extinguisher within reach
- Ground metal containers when transferring acetone to prevent static discharge
- Never heat acetone directly inside a sealed container
- Work outdoors or in a garage with the door fully open whenever possible
Proper Ventilation Prevents Toxic Exposure
Adequate airflow is non-negotiable. Acetone vapors cause respiratory irritation, central nervous system depression, and can lead to unconsciousness in enclosed spaces.
Minimum ventilation requirements:
- 10 air changes per hour minimum (measure your room volume, calculate required airflow)
- Preferred location: Outdoor work area or professional fume hood
- Never work in: Enclosed garages with doors closed, basements without windows, bathrooms, or small closets
- Vapor behavior: Acetone vapors are heavier than air and accumulate at floor level—ensure low-level ventilation
- Fan placement: Position exhaust fan toward open window, pulling air OUT of work area
Warning signs of inadequate ventilation: Headache, dizziness, nausea, eye irritation, drowsiness. If you experience any of these symptoms, immediately move to fresh air and improve ventilation before continuing.
Required Personal Protective Equipment
Even with excellent ventilation, PPE protects you from chemical exposure:
Respirator (REQUIRED):
- Organic vapor respirator with appropriate cartridges
- Recommended: 3M 6502QL Half Facepiece with 60923 organic vapor cartridges
- NOT sufficient: Dust mask, N95 mask, surgical mask (these don’t filter organic vapors)
- Replace cartridges when you smell acetone through the mask
Gloves (REQUIRED):
- Nitrile or neoprene gloves, 9-mil minimum thickness
- NOT latex—acetone degrades latex rapidly
- Replace when gloves become stiff or discolored
Eye Protection (REQUIRED):
- Chemical splash goggles with side shields, or full face shield
- Regular safety glasses are insufficient (no side protection)
Clothing (RECOMMENDED):
- Long sleeves and long pants to protect skin
- Closed-toe shoes (acetone damages many shoe materials)
- Chemical-resistant apron for extensive work
Proper Disposal Requirements
Acetone is classified as hazardous waste in most jurisdictions. Improper disposal is illegal and environmentally harmful.
⚠️ NEVER:
- Pour acetone down the drain or into water sources
- Dispose of liquid acetone with regular household trash
- Burn acetone-soaked materials
Proper disposal methods:
- Acetone-soaked materials: Place in sealed metal container, label as “Hazardous Waste – Acetone,” take to hazardous waste facility
- Liquid acetone: Take to licensed hazardous waste facility (check your local municipality for collection days)
- Some jurisdictions allow: Controlled outdoor evaporation in shallow pans in well-ventilated areas (verify local laws first)
- Reuse when possible: Acetone can be reused until it becomes discolored or contaminated

Proper ventilation setup for acetone vapor smoothing
3. Step-by-Step Acetone Vapor Bath Process
The vapor bath method is the most popular technique for acetone smoothing because it provides even, consistent results with minimal equipment. This controlled approach uses acetone vapors rather than direct liquid contact.
Setup Your Vapor Chamber Correctly
Container selection is critical: Use glass or polypropylene (marked “PP” on the recycling symbol). These materials resist acetone. Transparent sides allow monitoring without opening the chamber.
1 Choose appropriate container size: Provide at least 30mm clearance around all sides of your part. Larger chambers distribute vapor more evenly but require more acetone.
2 Create an elevated platform: Use aluminum foil-covered metal, wire mesh, or perforated metal sheet. The platform must elevate your part 10mm+ above the acetone source to prevent direct liquid contact.
3 Apply acetone strategically: Pour 10-50mL of pure acetone onto paper towels lining the container walls and bottom. DO NOT pool acetone at the bottom—this causes uneven vapor distribution and dripping.
4 Seal with ventilation: Place lid loosely with 2-3 small vent holes (3mm diameter). These prevent dangerous pressure buildup while maintaining vapor concentration. Never seal completely airtight.
Optional enhancement: Add a small explosion-proof fan inside the chamber for better air circulation. This reduces smoothing time by 20-30% and creates more uniform results.

7-frame step-by-step photo sequence showing chamber setup, part placement, monitoring, and removal
Monitor Smoothing Progress Carefully
Timing varies significantly based on part size, chamber volume, temperature, and acetone concentration. Use these guidelines as starting points, then monitor visually:
Timing by part size:
- Small parts (up to 50mm): 10-20 minutes
- Medium parts (50-150mm): 20-45 minutes
- Large parts (150mm+): 45-120 minutes
Check progress every 2-5 minutes through the transparent container walls. Look for these visual indicators:
- Surface begins to appear “wet” or glossy
- Layer lines become less defined and sharp
- Surface develops uniform sheen across all areas
- Stop BEFORE fine details blur or features soften
⚠️ Critical: Don’t open the lid excessively during smoothing—each opening releases vapor and extends the required time. Check through transparent sides whenever possible.
Drying and Post-Processing Timeline
Patience during the drying phase is essential. Touching prints too early ruins the surface with permanent fingerprints.
Drying timeline:
- Initial setting (15-30 minutes): Surface firms up but remains tacky to touch
- Safe handling (2-4 hours): Can carefully move part without surface damage
- Full cure (12-24 hours): Part ready for normal use, can handle normally
- Complete hardening (several weeks): Mechanical properties fully restore to original strength
During drying: Place parts in well-ventilated area away from dust. Support parts if needed to prevent warping as softened plastic re-hardens. Never touch the surface while it appears glossy or wet.
Heated Vapor Bath Variation (Advanced)
Adding controlled heat significantly accelerates smoothing but increases fire risk. Only attempt this if you’re experienced with basic vapor smoothing and understand the safety implications.
Heated method:
- Place chamber on 3D printer heated bed set to 40-60°C, OR work in warm environment (25-30°C ambient)
- Reduces smoothing time by 50%+ (10-minute smoothing becomes 5 minutes)
- Critical safety: NEVER heat acetone directly inside sealed container—explosion risk
- Use explosion-proof heating elements only
- Requires constant monitoring—over-smoothing happens much faster
- Have fire extinguisher immediately accessible
Alt text: “Time-lapse progression of ABS 3D print smoothing showing surface transformation at 10-minute intervals from rough layer lines to smooth glossy finish”
4. Common Mistakes and Troubleshooting Solutions
Even experienced makers encounter problems with vapor smoothing. Understanding causes helps you prevent issues and recover from mistakes.
Why Prints Warp During Smoothing
Problem: Print twists, bends, or warps during or after smoothing, ruining geometry.
Causes:
- Uneven vapor exposure (one side more exposed than another)
- Thin walls less than 1mm thick lack structural stability
- Excessive temperature causes uneven softening
- Inadequate support during drying phase
- Internal stresses from original print released when plastic softens
Prevention:
- Use appropriately sized chamber with adequate clearance on all sides
- Design parts with 2mm+ wall thickness minimum
- Control temperature carefully (room temperature is safest for beginners)
- Support thin or cantilevered sections during smoothing and drying
- Ensure original print is well-cooled and stress-free before smoothing
Solution if warping occurs: If caught very early while plastic is still soft, gentle heat and careful repositioning may help. For severe warping, the part is typically unrecoverable—accept the loss and learn for next time.
Solving Uneven Finish Problems
Problem: Some areas are glossy and smooth while others remain matte or rough, creating splotchy appearance.
Causes:
- Poor air circulation inside chamber
- Part too large for container (inadequate vapor distribution)
- Insufficient acetone or vapor concentration
- Premature removal before process completed
- Complex geometry with recessed areas vapor can’t reach
Prevention:
- Add small fan for circulation, or manually rotate part 180° halfway through
- Match container size to part size (30mm+ clearance all around)
- Use adequate acetone amount (10-50mL for typical chamber)
- Monitor until entire surface shows uniform glossy appearance
Solution: Return part to chamber for additional 5-10 minutes. Rotate to different orientation to expose previously under-smoothed areas.
Preventing Detail Loss and Over-Smoothing
Problem: Fine features blur, text becomes illegible, small details melt away, or entire print becomes blob-like.
Causes:
- Excessive exposure time (went past optimal point)
- Features too fine for technique (sub-1mm details always at risk)
- Direct acetone contact from dripping or splashing
- Temperature too high, accelerating process beyond control
Prevention:
- Use conservative timing—always start with minimum recommended time
- Test first on scrap prints or less valuable parts
- Accept technique limitations—very fine details (0.5mm or less) may not survive
- Consider selective masking with painter’s tape for areas requiring detail preservation
- Check frequently through transparent walls
Solution for selective smoothing: Use brush application method (dip brush in acetone, gently apply to specific areas) for selective smoothing rather than full vapor bath. This preserves detailed areas while smoothing larger surfaces.
Fixing Tackiness That Won’t Dry
Problem: Surface remains sticky or tacky even after 24+ hours, and feels rubbery to touch.
Causes:
- Over-exposure causing excessive acetone absorption into plastic
- Pooled liquid acetone on surface from dripping
- High humidity environment slowing evaporation
- Contaminated acetone containing oils or impurities
Prevention:
- Don’t over-expose—stop when surface looks glossy, not wet
- Ensure proper platform elevation prevents dripping
- Work in low-humidity environment when possible
- Use pure acetone (99%+), not nail polish remover with additives
Solution:
- Move to better-ventilated, warm, dry location
- Gently blow out any pooled liquid acetone with compressed air
- Place under fan or in warm (not hot) area to accelerate evaporation
- Allow extended cure time—may take several days in severe cases
- If tackiness persists beyond a week, the part may be unsalvageable
| Problem | Most Common Cause | Quick Solution |
|---|---|---|
| Warping/twisting | Uneven vapor exposure | Better air circulation, appropriately sized chamber |
| Uneven finish | Poor circulation | Add fan or rotate part halfway through |
| Detail loss | Over-exposure | Reduce time, check more frequently |
| Won’t dry/tacky | Too much acetone absorbed | Better ventilation, warm dry location, extend cure time |
| White marks/haze | Moisture contamination | Use fresh dry acetone, avoid humid conditions |
| Bubbles/blisters | Over-exposure or heat | Reduce time and temperature |
5. Alternative Smoothing Methods for Other Materials
Acetone vapor only works on ABS, ASA, and HIPS. For PLA, PETG, and other materials, these alternative post-processing methods deliver excellent results.
Epoxy Resin Coating Works on All Materials
XTC-3D is the industry standard two-part epoxy coating designed specifically for 3D prints. This method works on literally every FDM material—PLA, PETG, ABS, ASA, TPU, Nylon, everything.
Product specifications:
- 2:1 mix ratio (Part A to Part B)
- 10-minute working time after mixing
- 3.5-4 hour cure time until dry to touch
- Cost: Approximately $1.75 per ounce ($45 for 24oz kit)
Application technique:
- Mix equal parts A and B thoroughly for 2 minutes
- Apply thin coat with foam brush using even strokes
- Coating self-levels over 5-10 minutes—don’t overwork
- Allow to cure completely before handling
- Apply additional coats if needed (2-3 coats typical for best results)
Pros: Excellent smooth finish, works on ALL materials, fills small gaps and imperfections, no dimensional loss (adds material rather than removing), strengthens parts, immediately paintable
Cons: Moderate cost ($1-3 per part), time investment (multiple coat-and-dry cycles), can obscure very fine details if applied too thick, adds weight
Pro tip: Thin XTC-3D with 10-20% denatured alcohol for easier brushing and self-leveling on detailed parts. Add tints or dyes before application for colored finishes.
Sanding Progression Produces Mirror Finishes
Manual sanding is the most reliable method with complete control over results. It’s labor-intensive but works on every material and costs almost nothing.
Grit progression (don’t skip steps):
- 80-120 grit: Remove major layer lines and support marks (5-10 minutes)
- 220 grit: Smooth rough areas (5-10 minutes)
- 400 grit: Create uniform matte surface (10-15 minutes)
- 1000 grit: Semi-gloss appearance emerging (15-20 minutes)
- 3000 grit: High gloss finish (15-20 minutes)
- Optional: 5000+ grit: Mirror polish
Wet sanding technique: Keep sandpaper and part wet during sanding. This reduces dust generation, prevents sandpaper clogging, dissipates heat, and produces superior results.
Finishing: After 3000 grit, apply automotive plastic polish or Novus plastic polish with soft cloth for mirror-like shine.
Pros: Most reliable method, complete control, works on all materials, very low cost ($10-20 for sandpaper pack), no chemicals or safety concerns
Cons: Very time-consuming (1-3 hours for complex parts), physically labor-intensive, difficult on complex geometry with curves and recesses, generates dust (with dry sanding)
Heat Gun Smoothing for PLA and PETG
Careful heat application melts the surface layer just enough to flow and smooth without deforming the part. This technique requires practice and steady hands.
Settings and technique:
- Temperature: 200-300°F (95-150°C) for PLA, 250-350°F (120-175°C) for PETG
- Distance: 6-12 inches from surface
- Motion: Constant circular motion—never stay in one spot
- Visual cue: Stop when surface just begins to look “wet” or glossy
- Turntable method: Place part on rotating platform for even heating
⚠️ Warning: Heat gun smoothing is difficult to control and easy to ruin prints. Always practice on scrap parts first. Have metal tray underneath to catch any drips if part melts.
Pros: Very fast (minutes), no chemicals, can target specific areas, works well on large flat surfaces
Cons: Very difficult to control, easy to melt or warp parts, inconsistent results, not suitable for fine details, requires practice and experience
Filler Primers Build Up Surfaces
High-build filler primers fill layer lines and create smooth surface in multiple coat-and-sand cycles. This is the preferred method for parts that will be painted.
Recommended products:
- Rust-Oleum Filler Primer (spray can, easiest application)
- 3M Bondo Glazing and Spot Putty (for deep gaps)
- Tamiya Surface Primer (hobby-grade, excellent for small parts)
Process (2-4 cycles typical):
- Sand print with 120-220 grit to remove major imperfections
- Apply 2-3 coats of filler primer with 10-minute dry time between coats
- Allow to cure 30-60 minutes
- Wet sand with 220-320 grit until smooth
- Repeat primer application and sanding until layer lines disappear
- Final sand with 400 grit for painting
Pros: Very effective for eliminating layer lines, easier than pure sanding, immediately paintable, moderate cost, works on all materials
Cons: Time-consuming (multiple coat-dry-sand cycles), adds weight and dimension, requires ventilation for spray application, some skill needed for even coating
| Method | Time | Cost | Safety | Skill Level | Best For |
|---|---|---|---|---|---|
| Acetone Vapor | 20-30 min | $ | ⚠️ Moderate | Intermediate | ABS/ASA only |
| Epoxy Coating | 1-2 hours | $$ | ✓ Low | Beginner | All materials, best all-around |
| Sanding | 1-3 hours | $ | ✓ Low | Beginner | All materials, highest quality |
| Heat Gun | 5-10 min | $ | ⚠️ Moderate | Advanced | PLA/PETG, flat surfaces |
| Filler Primer | 2-4 hours | $$ | ⚠️ Moderate | Intermediate | Parts to be painted |
Alt text: “Comparison of 3D print smoothing methods showing results from acetone vapor, epoxy coating, sanding, heat gun, and filler primer techniques”
6. Design for Smoothing Success
Making smart design decisions before printing significantly improves smoothing results. Some geometries smooth beautifully while others are doomed to fail regardless of technique.
Print Settings That Optimize Smoothing Results
How you print affects how well smoothing works. These settings create the best foundation for successful post-processing:
Layer height: 0.2-0.3mm is the sweet spot
- 0.1mm too fine—wastes time, smoothing eliminates the benefit
- 0.2-0.3mm ideal—good detail, reasonable print time, smooths perfectly
- 0.4mm+ too rough—smoothing takes much longer, may not fully eliminate lines
Wall thickness: 2mm+ minimum for structural stability
- Thin walls (\u003c1mm) often warp during smoothing as plastic softens
- 2-3mm walls provide adequate rigidity
- Increase wall thickness for large parts prone to warping
Infill density: 15-20% is adequate
- Too low (\u003c10%) risks collapse when plastic softens
- Too high (\u003e30%) wastes material—smoothing only affects surface
- Gyroid or grid patterns work well
Print temperature: Standard settings work fine
- Slightly higher temps (235-245°C for ABS) may improve layer adhesion
- This creates better starting point for smoothing enhancement
Model Geometry Considerations
Not every 3D model is a good candidate for vapor smoothing. Understanding what works helps you set realistic expectations.
✓ Good candidates for smoothing:
- Rounded, organic shapes (character models, figurines, sculptures)
- Simple geometries with gradual curves
- Medium-to-large parts (50mm+)
- Decorative objects where exact dimensions aren’t critical
- Parts with 2mm+ wall thickness throughout
- Models without extremely fine details (\u003c1mm features)
✗ Poor candidates for smoothing:
- Tiny parts with fine details (miniatures with 0.5mm features)
- Thin walls less than 1mm thick
- Large flat plates (high warping risk)
- Functional parts with tight tolerances (±0.1mm fit requirements)
- Parts with deep recesses vapor can’t reach
- Assemblies with moving parts (dimensions will change)
Pre-smoothing design modifications:
- Add 0.5-1mm fillets to sharp corners (they’ll round anyway during smoothing)
- Increase wall thickness in thin areas
- Avoid deep recesses—chamfer or open them up
- Design parts slightly oversized if fit is critical (+0.3-0.5mm allowance)
- Split large flat surfaces into smaller sections
Test piece recommendation: Always test your specific filament brand and color on a simple 3DBenchy or calibration cube before smoothing valuable prints. Timing and results vary by material composition.
Alt text: “Examples of 3D models showing good candidates for acetone smoothing including organic shapes and rounded forms versus poor candidates including thin-walled parts and fine details”
7. Equipment Recommendations: DIY to Professional
You can start acetone vapor smoothing with minimal investment, or scale up to automated commercial systems for production. Here’s what works at every budget level.
DIY Setup for Beginners ($20-50 Total)
Everything you need to start smoothing ABS and ASA prints with excellent results:
Container: $10-15
- Glass food storage container with lid (Pyrex, Anchor Hocking)
- OR Polypropylene (PP) storage bin with clear sides
- Size: 8-12 inches for typical prints
Platform: $5 or free
- Aluminum foil over wire mesh
- Perforated metal sheet
- Cookie cooling rack wrapped in foil
Acetone: $5-10
- 16oz bottle of pure acetone (hardware store or pharmacy)
- One bottle lasts 20-30 smoothing sessions
- Look for 99%+ purity, avoid nail polish remover with additives
Safety equipment: $20-30
- Organic vapor respirator: 3M 6502QL (~$20)
- Nitrile gloves: Box of 100 (~$10)
- Safety goggles: (~$5-10)
When DIY makes sense: Learning the technique, occasional use (1-5 prints per month), single material (just ABS or ASA), budget-conscious makers
Commercial Systems for Production ($300-$20,000+)
Automated smoothing systems provide consistent results with minimal labor, justified when smoothing dozens of parts regularly.
Entry level: Polymaker Polysher (~$300)
- Automated IPA (isopropyl alcohol) misting for PVB filament
- Pre-programmed cycles, minimal setup
- Limited to PVB (Polysmooth) filament only
- Good for: Beginners wanting automated system, PVB-specific projects
Mid-range: Zortrax Apoller (~$6,000)
- Automated acetone vapor smoothing for ABS, ASA, HIPS
- Touchscreen interface, programmable cycles
- Handles parts up to 200x200x180mm
- Good for: Small businesses, makerspaces, education
Professional: AMT PostPro SF-Series ($20,000+)
- Industrial vapor smoothing for both SLS and FDM parts
- Multi-chemistry capability (various solvents)
- Automated processes with quality control
- Good for: Production environments, service bureaus, manufacturers
ROI analysis: Commercial systems break even at approximately 50-100 parts for mid-range systems, 200-300 parts for industrial systems. Calculate based on labor cost savings and production volume.
When commercial makes sense: Production volumes (10+ parts per week), consistency requirements, multiple materials, time-critical projects, professional service bureau operations
Alt text: “DIY acetone vapor smoothing equipment including glass container, platform, acetone bottle, respirator, gloves, and safety goggles laid out on work surface”
8. Frequently Asked Questions
Q: Does acetone work on PLA?
A: No, acetone does not work on PLA. The polymer structure is fundamentally different from ABS, so acetone makes PLA sticky and rubbery rather than smooth. Use mechanical methods instead: sanding, epoxy coating (XTC-3D), or careful heat gun application for PLA prints.
Q: How long should I leave my print in acetone vapor?
A: It depends on part size. Small parts (up to 50mm): 10-20 minutes. Medium parts (50-150mm): 20-45 minutes. Large parts (150mm+): 45-120 minutes. Always monitor visually through transparent container—stop when surface appears evenly glossy but before details blur. Check every 2-5 minutes.
Q: Can I use nail polish remover instead of pure acetone?
A: Pure acetone (99%+) is strongly recommended. Some nail polish removers contain only 70-80% acetone plus oils, fragrances, and moisturizers that interfere with smoothing. If you must use nail polish remover, verify it’s at least 80% acetone and contains no additives. Results will be slower and potentially uneven.
Q: Is vapor smoothing safe to do at home?
A: Yes, with proper precautions. You must work in a well-ventilated area (outdoor or garage with door open), wear organic vapor respirator and nitrile gloves, remove all ignition sources within 10 feet, and keep a Class B fire extinguisher accessible. Acetone’s flash point is -20°C (-4°F), so fire safety is critical. Never work in enclosed spaces.
Q: Will smoothing make my prints stronger?
A: Smoothing improves layer adhesion but may temporarily reduce strength. Prusa Research testing shows vapor smoothing improves layer adhesion by approximately 2x, creating better interlayer bonding. However, it may temporarily reduce x/y directional strength until the part fully re-hardens over several weeks. The surface becomes more impact-resistant and less prone to layer delamination.
Q: Can I smooth prints with fine details?
A: It depends on how fine. Features larger than 1-2mm typically survive well. Sub-1mm details (fine text, sharp edges, thin protrusions) often blur or soften. The technique works best on organic shapes and rounded forms rather than hard-edged technical parts. Always test on scrap first if detail preservation is critical.
Q: Why did my print warp during smoothing?
A: Warping usually indicates uneven vapor exposure or insufficient structural support. Causes include: container too small (inadequate clearance), thin walls less than 1mm, uneven temperature distribution, or excessive exposure time. Prevent warping by using appropriately sized chamber, designing parts with 2mm+ wall thickness, ensuring good air circulation, and monitoring carefully.
Q: Can I reuse acetone after smoothing?
A: Yes, reuse acetone until it becomes contaminated. You can reuse the same acetone for multiple smoothing sessions until it appears cloudy, discolored, or contaminated with plastic particles. This typically allows 10-20 uses. When acetone becomes too contaminated, dispose of it properly at a hazardous waste facility—never pour down drain.
Q: What container materials are safe for acetone?
A: Use glass or polypropylene (PP) containers only. These materials resist acetone. Unsafe materials include: ABS, polystyrene (PS), PVC, and many other plastics that acetone dissolves. Check recycling symbols—look for “PP” or number 5. Polyethylene (PE, number 2) also works but is rarely transparent.
Q: Can I smooth PETG, and if so, with what solvent?
A: PETG requires hazardous solvents not recommended for home use. While MEK (methyl ethyl ketone), dichloromethane, and ethyl acetate can smooth PETG, these chemicals require professional lab equipment, permits, fume hoods, and safety training. For home users, we strongly recommend mechanical methods instead: sanding, heat gun, or epoxy resin coating (XTC-3D works excellently on PETG).
Transform Your 3D Prints Into Professional Masterpieces
Acetone vapor smoothing delivers injection-molded quality finishes that elevate your 3D prints from obvious prototypes to professional-looking parts. When done correctly on ABS and ASA filaments, the technique eliminates layer lines, improves strength through better layer adhesion, and creates glossy surfaces in 10-60 minutes.
Key takeaways to remember:
- Only ABS, ASA, and HIPS work with acetone—PLA and PETG require alternative methods
- Safety is non-negotiable: proper ventilation, organic vapor respirator, fire precautions
- Always test on scrap prints first to dial in timing for your specific setup
- Design choices significantly impact results—2mm+ walls, 0.2-0.3mm layers
- Multiple smoothing methods exist—choose based on material and requirements
Start with the simple DIY vapor bath method on a test print. Practice on less valuable parts while you learn optimal timing and technique. Once comfortable, you’ll consistently produce prints that look professionally manufactured rather than homemade.
Ready to get started? Grab a glass container, pure acetone, proper safety equipment, and an ABS test print. Follow the step-by-step process above, monitor carefully, and prepare to be amazed by the transformation.
Have questions about smoothing your specific print? Drop a comment below—we respond to every question and love seeing your before/after results!
Found this guide helpful? Share it with fellow makers, bookmark for reference, and subscribe to our newsletter for more 3D printing tips and techniques delivered to your inbox.
I have tried this with some small parts printed in Polymaker ASA and nothing happened with them even after 3 hours. I’m using Acetone from the hardware store that I have had for years so maybe that might the issue? I’m also retrying it with the part printed in Polymaker ABS.
https://wiki.polymaker.com/printing-tips/post-processing/smoothing
Based on Polymaker’s guide, it seems that their ASA filament also supports smoothing. Could the issue be due to the type or concentration of acetone used?
Quick question regarding the fan inside the chamber. Is that safe, since its an electrical part surrounded by acetone vapor. Are there any reported incidents with that matter?
The fan should be an explosion-proof type. a regular PC fan isn’t safe inside the chamber since acetone vapor can ignite from micro-arcs or static. For home use we’d actually suggest skipping the internal fan and just rotating your part halfway through, or using a magnetic stirrer underneath. No major reported incidents we could find, but the risk is real.